

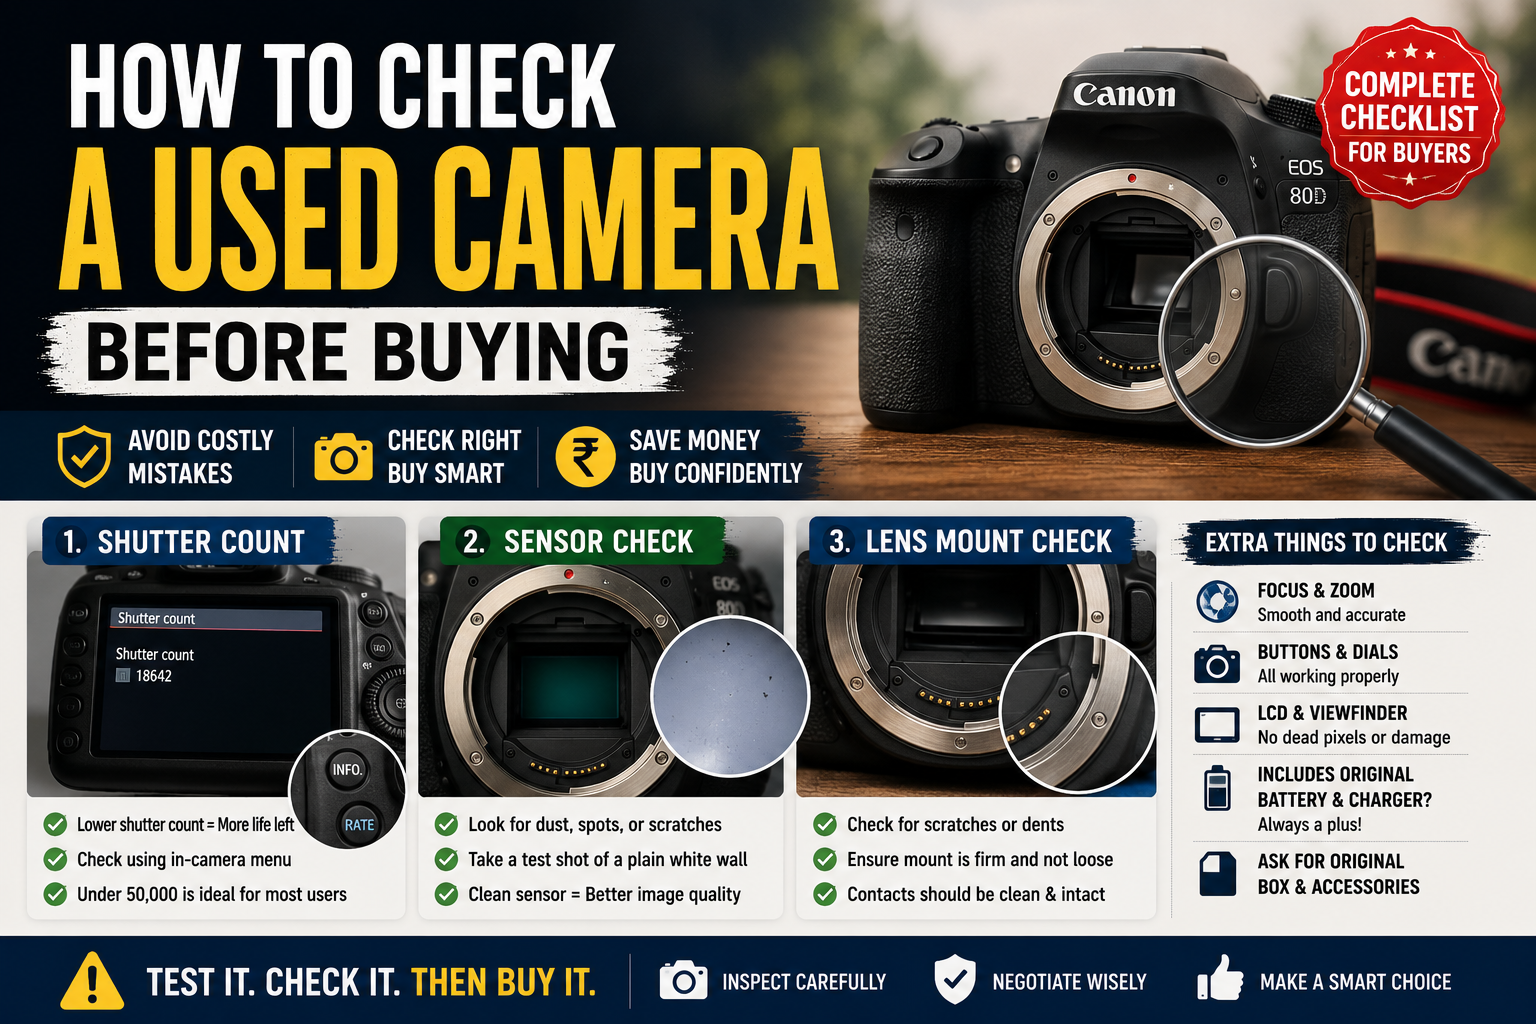
A good deal isn’t always a good camera. Learn how to inspect shutter count, sensor condition, lens mount, autofocus, buttons, and accessories so you can confidently buy a reliable used camera without costly surprises. Buying a used camera can be one of the smartest ways to save money while still getting professional-quality equipment. Whether you’re a beginner purchasing your first DSLR, a content creator upgrading to a mirrorless camera, or a professional looking for a backup body, the used camera market offers incredible value. However, a great deal can quickly become an expensive mistake if you don’t know what to inspect.
Many cameras look perfect on the outside but hide problems such as excessive shutter wear, damaged sensors, faulty autofocus systems, or worn-out lens mounts. These issues can lead to costly repairs or poor image quality. That’s why it’s essential to learn how to check a used camera before buying so you can confidently invest in reliable equipment.
This comprehensive guide walks you through every important inspection step—from checking the camera’s exterior to testing autofocus, shutter count, sensor condition, video recording, and more. By the end, you’ll know exactly what to look for before handing over your money.
Why Buying a Used Camera Is Worth It
Purchasing a second-hand camera offers several advantages when done correctly. Many photographers upgrade their gear frequently, meaning there are plenty of well-maintained cameras available at significantly lower prices.
Save a Significant Amount of Money
Most cameras lose value quickly after purchase. A model that’s only one or two years old can often be found for 20–40% less than its original retail price while still delivering excellent performance.
Access Higher-End Models
Instead of buying a brand-new entry-level camera, your budget may allow you to purchase a used mid-range or professional model with better image quality, autofocus performance, weather sealing, and build quality.
Ideal for Beginners
If you’re just learning photography, buying used lets you explore the hobby without making a huge financial commitment.
Environmentally Friendly
Buying second-hand extends the life of electronic devices and reduces electronic waste, making it a more sustainable choice.
Despite these benefits, buying without a proper inspection can result in unexpected repair costs. That’s why a careful evaluation is essential.
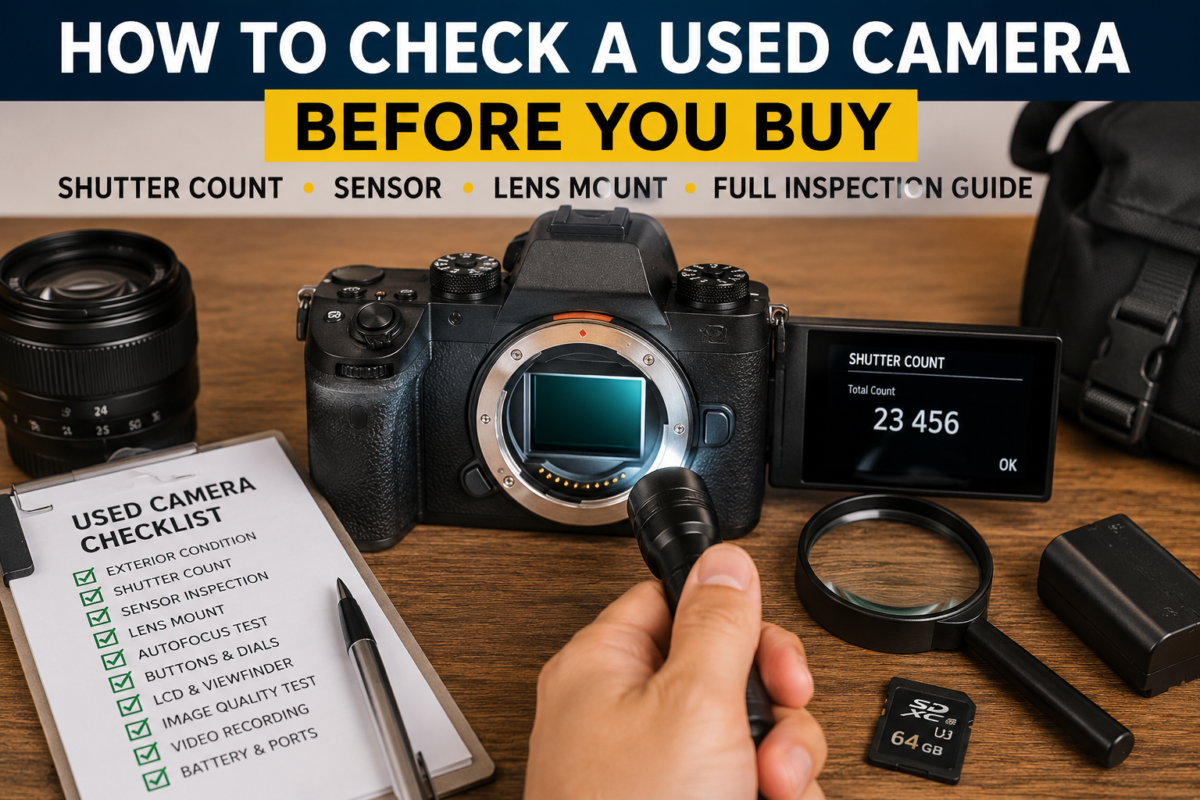
Tools You’ll Need Before Inspecting a Used Camera
Before meeting the seller, carry a few simple tools to properly test the camera.
Fully Charged Battery
If possible, bring a compatible battery. Some sellers may provide a battery with low charge, limiting your ability to test the camera thoroughly.
Memory Card
Carry your own SD or CFexpress card so you can capture test images and videos.
Laptop or Smartphone
A laptop allows you to examine photos at full resolution. Some modern cameras also transfer files directly to a smartphone using Wi-Fi or Bluetooth.
Small LED Flashlight
A flashlight helps you inspect the sensor, lens mount, ports, and hidden scratches.
Lens (If Buying Camera Body Only)
If the seller isn’t including a lens, bring one that’s compatible so you can test autofocus and image quality.
Cleaning Cloth
Dust can make a camera appear damaged. A microfiber cloth helps distinguish dirt from permanent scratches.
Exterior Inspection: How to check a used camera before buying
The first thing to inspect is the overall physical condition of the camera.
A well-maintained camera usually reflects careful ownership.
Check the Body for Damage
Look closely for:
- Deep scratches
- Large dents
- Cracks
- Missing screws
- Bent corners
- Loose rubber grips
Small cosmetic marks are normal, but major dents may indicate the camera has been dropped.
Check for Signs of Water Damage
Moisture damage can permanently affect internal electronics.
Watch for:
- Rust near screws
- Corrosion around battery terminals
- White residue
- Fog inside displays
- Mold
If you notice these signs, it’s usually best to avoid the camera.
Inspect Rubber Grips
Rubber grips should fit tightly against the body.
Loose or peeling grips often indicate:
- Heavy professional use
- Exposure to heat
- Poor storage conditions
While grips can sometimes be replaced, they may also suggest the camera has seen extensive use.
Check Tripod Mount
Inspect the tripod socket underneath the camera.
Look for:
- Stripped threads
- Bent metal
- Loose mounting plate
Frequent tripod use isn’t necessarily bad, but damaged threads can be inconvenient.
Sensor Inspection
The image sensor is the heart of any digital camera. Repairs or replacements can be expensive, making this one of the most important checks.
Visual Sensor Inspection
Remove the lens carefully.
Using a flashlight, inspect the sensor at different angles.
Look for:
- Scratches
- Oil spots
- Mold
- Excessive dust
- Cleaning marks
A few dust particles are completely normal and can be cleaned.
Scratches, however, are a serious concern and should generally be considered a deal-breaker.
Test the Sensor with a Photograph
Visual inspection isn’t enough.
Take a photo using these settings:
- Aperture: f/16 or smaller
- Manual focus
- Photograph a bright white wall or clear sky
Transfer the image to a laptop.
Zoom in to 100%.
Check for:
- Dark spots
- Dead pixels
- Sensor damage
- Unusual streaks
Dust appears as small dark circles and is usually harmless.
Permanent marks that remain after cleaning are much more concerning.
Lens Mount Inspection
The lens mount ensures perfect alignment between the lens and the camera body.
Even slight damage can affect autofocus accuracy and image sharpness.
Examine the Mount
Inspect the metal mount carefully.
Look for:
- Scratches
- Bent metal
- Missing screws
- Loose movement
A mount should feel completely solid.
Any wobbling may indicate previous impact damage.
Check Electronic Contacts
Modern cameras use gold electronic contacts to communicate with lenses.
Ensure they are:
- Clean
- Bright
- Free from corrosion
- Not bent
Dirty contacts can often be cleaned, but damaged contacts may require professional repair.
Mount and Remove a Lens
Attach a compatible lens.
It should:
- Lock securely
- Rotate smoothly
- Have no unusual resistance
- Show no excessive play
If the lens feels loose after locking, the mount may be worn.
Shutter Count Check
The shutter is one of the few mechanical components in most cameras, and every exposure contributes to its lifespan.
Think of shutter count like the mileage on a used car.
Most manufacturers rate shutters approximately as follows:
- Entry-level cameras: 50,000–100,000 actuations
- Mid-range cameras: 100,000–150,000
- Professional cameras: 200,000–500,000
A higher count doesn’t automatically mean the camera is bad, but it helps estimate remaining life.
How to Check the Shutter Count
The method depends on the camera brand.
Canon
Many Canon cameras require dedicated software or online tools that read the image metadata.
Nikon
Several Nikon models store shutter count in the EXIF data of the latest photo.
Sony
Sony cameras often require online shutter count checkers using an original JPEG image.
Fujifilm
Some newer Fujifilm cameras display the count through service menus or metadata tools.
Compare the reported shutter count with the expected lifespan for that model.
A camera with only 15,000–20,000 shutter actuations is generally considered lightly used, while one nearing its rated limit may justify negotiating a lower price.
Test Autofocus
Autofocus is one of the most critical systems in any camera. Even a camera that looks flawless can be frustrating to use if the autofocus is inaccurate or inconsistent.
Test Single Autofocus (AF-S / One Shot)
Point the camera at a stationary object with clear contrast, such as a sign or book cover.
Check whether:
- The camera locks focus quickly.
- The focus confirmation appears immediately.
- The captured image is sharp when viewed at 100% zoom.
Repeat the test at different distances to ensure consistent performance.
Test Continuous Autofocus (AF-C / AI Servo)
If you plan to shoot sports, wildlife, or moving subjects, continuous autofocus is essential.
Ask someone to walk toward you or track a moving object.
Look for:
- Smooth focus tracking.
- Minimal hunting (constant searching for focus).
- Sharp images throughout the burst.
If the camera frequently loses focus or struggles in good lighting, it may indicate autofocus issues.
Test Buttons and Dials
Every physical control should work perfectly.
Go through the camera systematically and press every button.
Check:
- Power button
- Menu button
- Playback button
- Delete button
- ISO button
- Exposure compensation
- AF selection
- Custom function buttons
- Movie record button
Each button should respond instantly without sticking or requiring excessive force.
Test Command Dials
Rotate every dial several times.
Ensure:
- No skipped values.
- No inconsistent scrolling.
- Smooth operation.
- Positive clicks.
Faulty dials are common in heavily used cameras and can be expensive to repair.
LCD and Viewfinder Check
The display is your primary interface for composing images, reviewing photos, and adjusting settings.
LCD Screen Inspection
Examine the screen carefully.
Look for:
- Deep scratches.
- Dead pixels.
- Bright spots.
- Cracks.
- Yellow discoloration.
- Uneven brightness.
Increase and decrease the screen brightness to verify it functions correctly.
If the camera has a touchscreen:
- Test touch response across the entire display.
- Navigate menus.
- Pinch-to-zoom photos.
- Select focus points.
Dead zones may indicate screen damage.
Electronic Viewfinder (EVF)
Mirrorless cameras rely heavily on the EVF.
Check:
- Brightness.
- Color accuracy.
- Refresh rate.
- Dead pixels.
- Flickering.
The image should appear smooth and natural.
Optical Viewfinder (DSLR)
Look through the viewfinder for:
- Dust.
- Fungus.
- Misalignment.
- Cracks.
Minor dust is usually harmless, but significant contamination may require servicing.
Battery Health
A worn-out battery can reduce shooting time significantly.
Inspect the Battery
Check for:
- Swelling.
- Cracks.
- Corrosion.
- Loose contacts.
Never buy a swollen lithium-ion battery.
Battery Performance
Insert the battery and observe:
- Charging level.
- Battery warning messages.
- Unexpected shutdowns.
If possible, leave the camera powered on for 10–15 minutes while testing.
A healthy battery should maintain its charge without sudden drops.
If the battery is old, factor the replacement cost into your purchase decision.
Memory Card Slot
The memory card slot is another frequently used component.
Insert your own memory card.
Verify that:
- The card inserts smoothly.
- It locks securely.
- The camera recognizes it immediately.
- Images save successfully.
- Photos can be reviewed without errors.
For cameras with dual card slots, test both individually.
Any write errors or intermittent recognition problems could indicate hardware issues.
Check All Ports
External ports are important if you transfer files, connect microphones, or shoot tethered.
Inspect:
- USB port.
- HDMI port.
- Microphone input.
- Headphone jack.
- Remote shutter port.
- DC power input.
Ensure:
- No bent pins.
- No corrosion.
- Protective covers remain attached.
- Cables fit securely.
Loose or damaged ports may require motherboard repairs.
Test the Built-in Flash
If the camera includes a built-in flash, test it before purchasing.
Verify:
- Flash pops up correctly.
- Opens smoothly.
- Fires consistently.
- Recharges within a few seconds.
Capture several photos using flash.
Watch for:
- Uneven lighting.
- Failure to fire.
- Error messages.
If you regularly use flash photography, this test is especially important.
Image Quality Test
Now it’s time to evaluate the camera’s actual output.
Take several photographs in different conditions.
Shoot:
- Outdoors in daylight.
- Indoors.
- Bright subjects.
- Dark subjects.
- High-contrast scenes.
Review every image at 100% zoom.
Look for:
- Sharpness.
- Accurate colors.
- Proper exposure.
- Excessive noise.
- Strange color casts.
- Banding.
- Dead or hot pixels.
Also inspect image corners to ensure there are no unusual soft areas caused by sensor or mount alignment issues.
Video Recording Test
Even if you mainly shoot photos, test the camera’s video capabilities.
Record several short clips.
Check:
- Autofocus during video.
- Audio recording.
- Stabilization (if available).
- Screen responsiveness.
- Exposure adjustments.
- Recording time.
Play back the footage and listen carefully.
Watch for:
- Distorted audio.
- Clicking sounds.
- Frame drops.
- Overheating warnings.
- Random recording interruptions.
If the camera overheats after only a few minutes under normal conditions, it may have underlying hardware problems.
Red Flags to Avoid
Even if a used camera appears to be in good condition, certain warning signs should make you think twice before buying. Spotting these early can save you from expensive repairs and future frustration.
1. The Price Is Too Good to Be True
If a camera is priced far below the average market value, ask yourself why.
Possible reasons include:
- Hidden defects
- Water damage
- Stolen equipment
- Fake or refurbished parts
- Missing accessories
Compare prices across trusted marketplaces before making a decision.
2. The Seller Avoids Questions
A genuine seller should be able to answer questions such as:
- How long have you owned the camera?
- Why are you selling it?
- Has it ever been repaired?
- Has it been dropped?
- Has it been used professionally?
If the seller gives vague or inconsistent answers, proceed with caution.
3. Missing Original Accessories
While not a deal-breaker, missing accessories can reduce the value of the camera.
Check whether it includes:
- Original battery
- Charger
- Neck strap
- Body cap
- USB cable
- User manual
- Original box
- Purchase invoice or warranty card (if available)
Original accessories often indicate the owner took good care of the equipment.
4. Signs of Water or Impact Damage
Avoid cameras showing:
- Rust or corrosion
- Fungus
- Mold
- Bent body panels
- Broken hinges
- Loose lens mount
- Cracked LCD
- Missing screws
These issues may point to serious internal damage.
5. High Shutter Count with Heavy Wear
A high shutter count isn’t always bad, especially for professional cameras. However, if it’s combined with:
- Worn rubber grips
- Deep scratches
- Loose buttons
- Sticky dials
- Damaged ports
the camera has likely seen extensive use and may require maintenance soon.
6. Error Messages During Testing
Don’t ignore messages such as:
- “Camera Error”
- “Card Error”
- “Lens Communication Error”
- “Cannot Record”
- “Battery Error”
Even if they disappear after restarting, they could indicate underlying hardware or firmware issues.
Negotiation Tips
Once you’ve completed your inspection, use your findings to negotiate a fair price.
Research the Market Value
Before meeting the seller, check the average price of the same model in similar condition. This gives you a realistic benchmark and strengthens your negotiation.
Point Out Genuine Issues
If you find:
- Cosmetic scratches
- High shutter count
- Worn battery
- Missing accessories
- Minor wear
mention them politely and explain how they’ll affect future costs.
Factor in Replacement Costs
If you’ll need to buy:
- A new battery
- A charger
- Memory cards
- Lens caps
- Camera bag
include these costs when discussing the final price.
Be Prepared to Walk Away
One of the strongest negotiation tools is the willingness to leave if the deal doesn’t make sense. There are always more cameras available, and rushing into a purchase can lead to regret.
Frequently Asked Questions (FAQs)
Is buying a used camera safe?
Yes. Buying from a trusted seller and performing a thorough inspection can help you get excellent value while minimizing risk.
What is a good shutter count for a used camera?
Generally:
- Under 20,000: Excellent
- 20,000–50,000: Very Good
- 50,000–100,000: Good (depending on the model)
- Above 100,000: Evaluate based on the camera’s rated shutter life and overall condition.
Professional cameras are designed to handle much higher shutter counts than entry-level models.
Can sensor dust be cleaned?
Yes. Dust is common and can usually be removed using a blower or professional sensor cleaning. However, scratches or permanent marks on the sensor are much more serious.
Should I buy a used DSLR or a used mirrorless camera?
Both are excellent choices. Your decision should depend on your photography needs, available lenses, budget, and preferred shooting style rather than age alone.
Is cosmetic damage a problem?
Minor scratches and normal signs of use are expected. However, dents, cracks, or impact damage may indicate internal issues and should be inspected carefully.

Should I ask for sample photos before buying?
Absolutely. Request recent JPEG and RAW images captured by the camera. They can reveal sensor issues, image quality problems, and other defects before you meet the seller.
Final Used Camera Buying Checklist
Before paying, make sure you’ve completed this checklist:
- ✔️ Inspect the camera body for cracks, dents, and heavy wear.
- ✔️ Check the sensor for dust, scratches, or dead pixels.
- ✔️ Examine the lens mount and electronic contacts.
- ✔️ Verify the shutter count.
- ✔️ Test autofocus accuracy and tracking.
- ✔️ Check every button, dial, and touchscreen.
- ✔️ Inspect the LCD and viewfinder.
- ✔️ Test battery health and charging.
- ✔️ Verify both memory card slots (if available).
- ✔️ Check USB, HDMI, microphone, and headphone ports.
- ✔️ Test the built-in flash.
- ✔️ Capture photos in different lighting conditions.
- ✔️ Record a short video and review the footage.
- ✔️ Review sample images at 100% zoom.
- ✔️ Confirm serial numbers and included accessories.
- ✔️ Compare the asking price with the current market value.
- ✔️ Ask about service history, repairs, and warranty.
- ✔️ Buy only if you’re satisfied with the camera’s overall condition.
Conclusion
Knowing how to check a used camera before buying can save you money, prevent unexpected repairs, and help you purchase equipment that delivers reliable performance for years. A careful inspection of the camera body, sensor, lens mount, shutter count, autofocus system, battery, ports, and image quality allows you to spot potential problems before making a commitment.
While a few cosmetic marks are perfectly normal on a second-hand camera, issues such as sensor scratches, water damage, faulty autofocus, or recurring error messages should be treated as serious warning signs. Taking the time to inspect every component—and asking the seller the right questions—can make the difference between finding an excellent bargain and buying a costly mistake.